Solar prep is wiring, not solar. A “solar ready” RV has a port, a cap on the roof, or both, with cable run to the battery — and usually no panels and no charge controller. What you can plug into it depends on which port your builder fitted, and the companies that make those ports do not agree with each other about that.
So the useful order is: work out which kind of prep you have, identify the port, and test it with a meter before anything gets plugged in. Go Power, whose port Forest River, Keystone and others fit, said it plainly in a reply on its own store: “We have seen RV manufacturers wire that solar port wrong from the factory.”
The three kinds of prep
Three prep arrangements described in Jayco’s 2024 towable manual. Solid boxes show the prep path; dashed boxes show equipment to add. Verify what your own RV actually contains.
1. Side port → battery
Inside the RV
Use a regulated kit on a verified battery-connected port. The kit’s controller stays outside with the panel.
2. Roof port → interior wall
At the marked interior wall
The cable route may be ready while the controller position is only a decal and capped wiring.
3. Roof port → front basement
In the front basement compartment
The controller location changes. A connection to the RV’s control panel does not mean a charge controller is fitted.
Already have a factory controller? Trace its PV input and battery output before adding equipment. A regulated portable-kit output generally belongs on a compatible battery-side port, not the PV input of a second controller.
Conceptual routes only: individual conductors and accessory wiring are omitted. Confirm polarity, voltage/current limits, wire size and protection from the builder’s diagram. A matching plug or a battery-voltage reading alone does not prove the full route or compatibility.
Source: Jayco 2024 towable manual, Solar Prep. These examples do not define a standard for every RV.
Jayco’s 2024 towable owner’s manual describes three, and they map well onto what other builders fit:
- A port on the outside wall — side wall, A-frame or utility center — for “a suitcase style controller/solar panel combo”, wired “to the battery via a 20-amp 12-volt circuit breaker”.
- A roof port, wired to an inside wall where “a solar controller may be installed”, then to the battery through a 30-amp breaker. A decal marks the spot.
- A roof port, wired to the front basement compartment, again to where a controller may be installed, through a 30-amp breaker and into the coach’s control panel.
The two words that matter are “may be installed”. A widely read dealer guide says that for most RVs, solar prep “means a pre-installed solar charge controller”. Jayco’s manual describes a space for one, and Go Power says of its side port that “To use this port to charge your batteries you will need to purchase a portable solar kit with a controller.” On a side port, the controller travels with the panel. On a roof prep, check whether the controller space is empty or a unit was fitted later. If a factory solar package already includes a controller, identify its PV input and battery output before adding anything.
Which port do you have?
Look at the port and the sticker beside it.
| Port | How to recognize it | What its maker says it is wired to | Rating |
|---|---|---|---|
| Zamp Solar Ready | Round cap, SAE-style plug; stickers such as “Only Use Zamp Solar Portable Charging Systems” | Zamp: some prep packages “include full wiring, while others only wire from the roof to the batteries” | Not stated in Zamp’s FAQ |
| Go Power! Solar on the Side | Round black cap branded Go Power!, SAE-style plug; on Forest River, Keystone, Nobo and Rockwood rigs among others | “This port is wired directly to your battery” | 20 A |
| Furrion 10A solar inlet | Square inlet, Furrion branded | Lippert lists it for “Furrion 10A PWM solar charger” | 10 A, 12–14 V DC |
| Roof cap or junction box | On the roof; MC4 leads or a Go Power cap | To a controller location inside, per the builder | Verify PV cable, connector and controller-input ratings separately from the battery-side breaker |
One change most guides predate: Zamp is now part of Dometic, the same company as Go Power. Zamp’s site carries the banner “The Zamp Solar Store Is Closed”, and its footer reads “Dometic Mobile Power Solutions”. The ports are still on the rigs they were fitted to; buying Zamp-branded kits new is harder.
Who says what fits
This is where the sources disagree, and the disagreement is the reason to test.
- Zamp’s FAQ: “Zamp Solar ports are only compatible with Zamp Solar SAE plugs.” The reason it gives is safety: “the positive pin on all of our SAE plugs is set back and covered”, and to the question “Is the Zamp Solar port reverse polarity?” it answers “No”.
- Go Power’s DuraLite listing: the kit “Plugs directly into Zamp Solar Ready side wall ports and Go Power! Solar On The Side ports.” Its GP-PSK-90 listing says “Zamp Solar On The Side compatible.”
- Go Power’s own port guide, on a Zamp port with Go Power panels: “You’ll need an MC4 to SAE adapter to bridge the connection.” That applies to panels with MC4 leads; the DuraLite and PSK kits ship with their own SAE adapter. The MC4-to-SAE adapter Go Power sells for it, the GP-SOLAR-PLUG6, was listed as sold out on 22 October 2026.
Two sister brands, three documents, three different answers. None of them publishes which pin is positive on its port or adapter. A meter can establish polarity on a known battery-side port; it cannot establish the entire wiring route or prove that a controller is absent.
Test the port before you plug anything in
These steps apply to an identified, low-voltage battery-side portable port. First check the builder’s wiring diagram and trace its controller connections. Do not apply this test to an unidentified roof/PV connection; arrange inspection if you cannot establish the route and possible voltage.
Ten minutes with a multimeter
-
Confirm the battery-side route and its protection
Keep the portable panels disconnected. Follow the RV manual for the battery connection and port breaker. Jayco’s example side port has a 20-amp breaker; do not assume another rig has the same wiring.
-
Set the meter to DC volts and probe the port’s two contacts
Use a suitably rated meter with its leads in the voltage/COM sockets, never the current socket. Keep the probe tips apart. A live battery-side port should read near battery voltage, which varies with chemistry and charging.
-
Read the sign, and mark the positive contact
A positive reading means the red probe is on positive. A negative reading means the opposite contact is positive. Write it down or put a dot of paint by it — this is the fact no maker publishes for your port.
-
If you read nothing, find out why before buying anything
Possible causes include an open breaker, a disconnected cable, a battery BMS cutoff or a controller in the route. Neither zero volts nor battery-like voltage proves how the whole circuit is wired.
-
Match the kit’s plug to the port
Check polarity, voltage and current ratings against both manuals. Use a manufacturer-approved adapter if needed. An adapter changes the connection; it does not add a charge controller or make an undersized port suitable.
-
Follow the kit’s connection order, then check charging
Follow the exact kit manual for connecting the battery, controller and panels, including any instruction to cover the panels first. Select the correct battery profile and check the controller display. Do not use a reverse-polarity alarm as the compatibility test.
How much a port can carry
The lowest applicable rating of the port, wiring, connectors and protection sets the limit. Identify which side of the controller the port is on.
- Go Power Solar on the Side: rated for 20 amps.
- Jayco’s side port: a 20-amp breaker. The roof-prep examples have a 30-amp breaker in the battery path; this does not establish the PV input limit.
- Furrion’s square inlet: 10 amps, with a 12–14 V DC working voltage.
For a regulated kit feeding a battery-side port, compare the kit controller’s maximum battery-output current with that path’s limit. A 30 A controller is not a guarantee that a 20 A port can accept every panel configuration it supports. Use an approved output limit or a kit configuration the makers explicitly allow. Raw panel short-circuit current is not a universal substitute, especially with MPPT.
At an illustrative 14.4 V battery voltage, 20 A is about 288 W delivered to the battery and 10 A about 144 W. Those are not panel-nameplate limits. A raw PV port instead needs checks of cold-weather open-circuit voltage, array current, wire and connector ratings, and the installed controller’s PV limits.
How much panel you actually need for the month you camp in is a separate question, and how much solar an RV needs works it out. If the port is a long way from the battery, the cable inside the wall is the builder’s; anything you add, size with the 12V wire size calculator.
Portable on the side port, or panels on the roof
The two kinds of prep lead to two different systems.
A portable kit on a side port goes wherever the sun is, so you can park in the shade and still charge, and it comes with its own controller. The trade-offs are setup, theft and weather: Go Power’s DuraLite manual says “This kit IS NOT weatherproof” and warns against leaving it out overnight. If you have a lithium bank, check the kit’s controller has a lithium profile — the DuraLite’s does, for LiFePO4 with a BMS only — and know that it “does not limit current” for a lithium battery’s cold-weather charge limits; charging lithium in the cold covers why that matters.
Panels on a roof prep charge whenever the sun is on them, including while you drive, but only where the rig is parked, and only flat — unless they tilt, which in winter is worth far more than most guides say: is tilting RV solar panels worth it. Rigid or flexible is its own decision, and the makers’ warranties and mounting instructions disagree more than most guides admit — flexible vs rigid RV solar panels sets them side by side. The controller is yours to choose, and the limit that catches most installs is the array’s open-circuit voltage on a cold morning: what size solar charge controller checks your panels against it. If you would rather buy the panels and controller together, our panels-and-kits roundup checks every kit’s panels against its own controller, and covers Go Power’s Overlander, which is built for Go Power’s roof prep.
Either way, if a factory system that should be charging is not, four readings at the controller find the fault before you buy anything.
If you are buying a portable kit for a side port
Both of these come from Go Power, whose ports and kits are designed together, and both carry their own controller. Neither is a recommendation to skip the meter test above.
Side-wall port, lithium bank
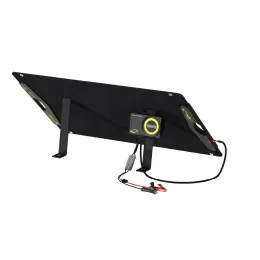
DuraLite 100
A 30 A controller with a LiFePO4 profile built into the kit, and Go Power says it plugs into both Zamp and Go Power side ports. Not weatherproof.
Smaller and cheaper, if you can find one
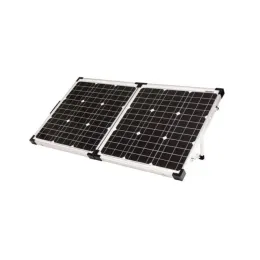
GP-PSK-90
A rigid 90 W suitcase with a 10 A controller and a 25-year panel warranty in its manual. Go Power's store lists it as a legacy model.
Go Power’s own documents disagree on some DuraLite figures — its weight is given as 10 lb, 9.0 lb and 8.4 lb, and its panel warranty as two years in the Quick Start Guide but one year in the 2022 manual. We list the conflicts rather than pick one.
Questions worth answering
What does solar prep mean on an RV?
Wiring, not panels. Jayco's owner's manual describes three versions: a port on the outside wall wired to the battery through a 20-amp breaker, for a suitcase-style panel with its own controller; and two kinds of roof port wired down to a spot where "a solar controller may be installed", then to the battery through a 30-amp breaker. Other builders vary, and there is no industry standard.
Does a solar-prepped RV come with a charge controller?
Usually not. Go Power says its Solar on the Side port is "wired directly to your battery" and that you "will need to purchase a portable solar kit with a controller". Jayco's roof prep runs to where a controller "may be installed". Go Power adds that some side ports are wired "sometimes through a factory controller", which is one reason to test the port before plugging anything in.
Can I plug any portable solar panel into a Zamp Solar Ready port?
Zamp says no: its FAQ states that Zamp Solar ports "are only compatible with Zamp Solar SAE plugs", because Zamp's plug has its positive pin set back and covered. Go Power, now Zamp's sister brand under Dometic, says its DuraLite kit "plugs directly into Zamp Solar Ready side wall ports". Confirm the wiring route, polarity, voltage and current limits, and the kit's compatibility before connecting it. A matching plug is not enough.
How do I test my RV solar port?
First identify it as a low-voltage battery-side port from the builder's wiring diagram. With panels disconnected, follow the RV manual for the battery and breaker. Use a suitably rated meter in DC-voltage mode with the leads in voltage/COM sockets. The sign identifies polarity, but a battery-like reading does not prove the complete route or absence of a controller. An unidentified roof/PV port needs a different procedure.
How many watts can I plug into a side-wall solar port?
Check the lowest rating of the port, wiring, connectors and protection. For a regulated kit feeding a battery-side port, compare its maximum battery-output current with that limit; raw panel short-circuit current is not a universal substitute. At an illustrative 14.4V, 20A delivers 288W and 10A delivers 144W to the battery. Those are not panel-wattage limits.
Is solar prep worth it?
It saves running a cable through the wall and finding a path to the battery, which is the fiddly part of a portable-panel setup. It does not give you any solar on its own, and on a roof prep the controller, panels and mounting are all still to buy. Whether that is worth anything depends on how often you camp without hookups.